Showing posts with label Arduino. Show all posts

Sunday, July 03, 2016

Connecting IOT to 4G LTE Network, the Verizon way

If you are interested in IOT, perhaps you should check out this URL. Verizon lays down its plan to connect IOT with the its 4G LTE Network. You can even get started with this at the above mentioned URL.

 In order to use the Wireless Network Services API, you need the SDK which you request here.

Verizon M2M Platform is central to this with the Wireless Network Services (WNS). With this you automate provisioing, monitoring and control of wireless MEM Devices.

It also provides user interfaces backed by an SDK. These are the,
Unified Web Servies(UWS) SDK and the M2M Management Center, a web portal for all monitoring activities.

What kind of devices will be supported?

Verizon-certified IOT development kits and sensors. Some are self-contained with everything and some operate with platforms like Windows, Arduino, Raspberry PI and BeagleBone.

In additions to wired connections there are Wi-Fi, cellular and Low Energy BlueTooth are supported.
Here is a link to the showcase that uses Veriaon M2M Platform.

Sunday, May 22, 2016

Johnny-Five robotics and IoT Platform

Johnny-Five is the JavaScript Robotics & IOT platform released by the Bocoup group. Johnny-Five is maintained by a growing number of talented developers.

What is Bocoup?
Bocoup  is a group that championed the cause of Open tools and WorkFlow. They really seems to have people with very varied and diverse talents to tackle web, data, and visualization.

How does Johnny-Five handle the Hello World (or Blink for that matter)?
It looks like 1-2-3 really.

1. Install Node.js(Preffeer 4.2.1 LTS)
2. Setup your board
3. Run: npm install johnny-five

What else is needed?

You also need to run the Firmata protocol for the controller board to communicate with the computer.
Interestingly Johnny-Five can handle over 30 different arduino compatible boards from the likes of Raspberry, Intel, Arduino, Sparkfun and many more.

This is very impressive indeed as each of these boards are handled by their vendors like Arduino, Intel and others.

How about non-arduino boards?

There are platform specific IO Plugins (for example, Galileo-IO plugin) .These plugins can speak the language of the platform as they implement Firmata compatible interfaces.

You will be hearing more about Johnny-Five in my blogs, here and here, keep reading....

Sunday, May 01, 2016

Internet of Things: Visual Studio 2015 Community Edition and Arduino

Visual Studio 2015 Community is a one-stop tool by Microsoft for most things and you can use the same tool for working with Arduino/Intel line of IOT boards. However, a default installation of VS 2015 Community does not support these boardss. You need to install an extension available online as shown here:

Launch Visual Studio 2015 and click on Tools | Extensions and Updates...


In the search box for items online, type Arduino and Click search. Arduino IDE for Visual Studio get displayed in the results pane as shown.

 Click Download and the program starts downloading the VSIX (5.55.MB) installer.


It is now ready to install but accept the license terms and click Install.

It takes a little while to install and after it is installed you get the following message. You need to restart for changes to take effect,


Restart VS 2015 Community and there are items in Menu, Tools and Project where you can see that the installation has been effective.

vMicro menu item:
 New | Arduino Project

 Tools | Visual Micro

Now that you have installed the extension you can work with Arduino projects importing the Arduino 'Sketches' or creating from scratch.


Tuesday, December 01, 2015

Cumulocity is IoT Ready, go for it

 The keywords for this IOT company are Connect, Manage, Extend and do more things. In order to have wide applicability you can connect anything over any network.
Connect at Cumulocity has the following features:
  • Connect out-of-the box to more than 30 usable certified devices (whole list is here, but I could only recognize, Raspberry and a Arduino variant). Looks like it is heavy on LINUX and JAVA-based but I may be missing the others) 
  • More than 10 embedded environments supported
  • RestAPIs for any connected device


Connect Over any network

  •     Runs on all networks, mobile or fixed.
  •     No need to open your firewalls.
  •     No need to purchase additional VPN services.
  •     Reduce your mobile traffic using SmartREST by 80% over other HTTP APIs.

While connecting is the first step, managing the connected items has top priority.
Cumulocity can,
  • Store and Manage all your data- Store, search and track all assets, devices, configs, measurements,etc
  • Control assets in real-time securely from anywhere
  • Keep everything online; monitor device availability, monitor/control SLA violations, etc

Extending is important as you may need tailor to your needs.
  • With Cumulocity you can fashion your own IoT in minutes using the Cumulocity Application Builder mashing it up with your business rules.
  • Extend by plugging-in your own devices
  • Add real-world capabilities to your data

  • Cumulocity has the  most modern web interface (speed and responsive) and supports tablets and smartphones right away.
  • Cumulocity is enterprise-ready: users, groups, permissions; audit security related events etc

Want to try for free, no problem.
Look at all these happy customers.

Thursday, October 08, 2015

One easy way to get started with Internet of Things

Internet of Things is all the hype and the field is getting crowded each day.

LittleBits Electronics offers the CloudBit Module which is a easy and quick option to create Internet connected devices. You can tag on Internet to many things without you needing to program anything. There are many, many projects that you can do with this module. Using IFTTT (read about it in an earlier post) you can connect to any web service or whatever that IFTTT supports. Together with Arduino you could even do custom coding.  The module comes with a USB power module and a wall adapter. It looks like a toy but packs great power.


CloudBit Module

CloudBit Module is an embedded Linux computer with a WiFi and automatically communicates with littleBit Cloud. When used for the first time, the module functions like a WiFi router allowing you to connect to the Internet. The core of the module is the iMX233 SOC which includes CPU Core; the power supply, and peripherals like USB, ADC, DAC etc. The device boots of the SD card via an SSP Port.

Here is a video:


IoT is not just for IT Professionals it is also for any age.

Sunday, June 14, 2015

Internet of Things, Arduino and Blynk

Blynk is a another platform with iOS and Android apps to control Arduino. Raspberry Pi and others.

It is a digital daskboard where you drag and drop widgets and get things going reapidly. It's like 5 minutes the advertiesment says (http://www.blynk.cc/).


Looks like it is transparent to the type of board or shield(hardware). Arduino or Raspberry gets linked to Internet over WiFi, Ethernet or the new chip ESP8266. You are set,ready and Go.

Blynk is for iOS (ver 8 or higher) and Android, sorry Windows Phone users. You need to install Blynk Library from this site:http://www.blynk.cc/getting-started/

All you need to do is to start Blynk and add widgets. Build

Here is a simple Blynk program from their site:
https://codebender.cc/example/BlynkSimpleEthernet/GettingStarted:PushData


Tuesday, June 09, 2015

Arduino's analog serial readout with PowerShell

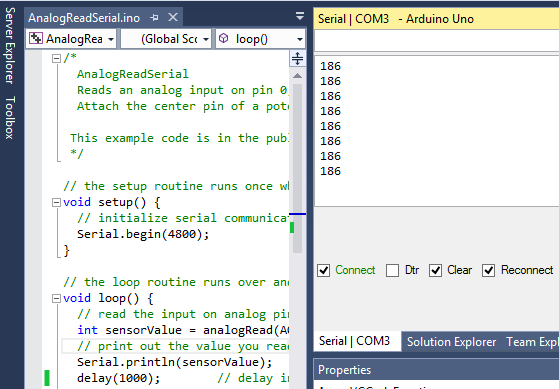
This is one of the example sketches (AnalogReadSerial) which reads out the potentiometer setting on Arduino Uno. The sketch is simple as shown below (some parameters may be different):


void setup() {
 
// initialize serial communication at 4800 bits per second:
 
Serial.begin(4800);
}


// the loop routine runs over and over again forever:
void loop()
{
  // read the input on analog pin 0:
  int sensorValue = analogRead(A0);
  // print out the value you read:
  Serial.println(sensorValue);
 
delay(1000);       
// delay in between reads for stability
}


Once you connect the Arduino to the USB drive with the potentiometer powered 0 to 5V
you can run the project in Visual Studio 2013 Community Edition. You can display the potentiometer setting in the Serial Monitor.


Trying to run a C# project reading the serial port also works but the ReadLine() of the Serial Port method gives ambiguious Values and not very consistent. I am not sure what the problem is. Still working on it.

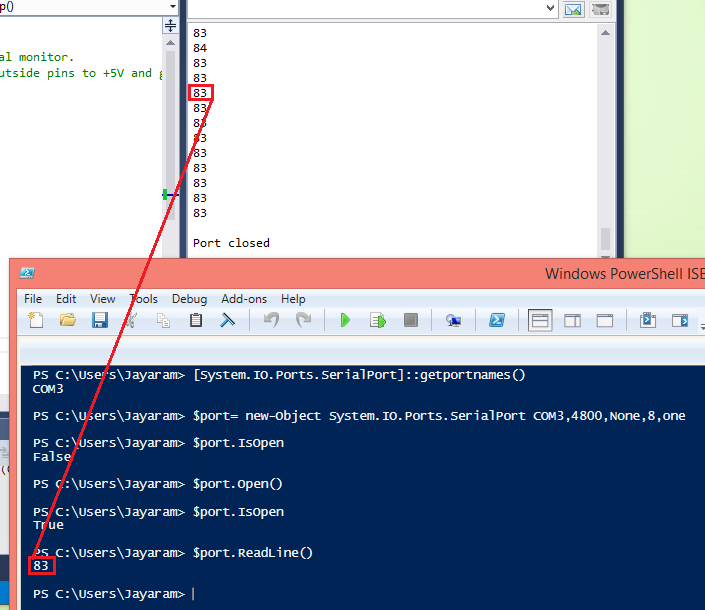
However PowerShell offers a convenient way of reading the value on COM3 port connected to the potentiometer.

For monitoring I am still using Visual Studio 2013 Community Edition, which allows be connect and disconnect from the port easily form the Serial Port Monitor.
Connecting to read the Serial Port from PowerShell is very easy with few lines of code. However, one problem I have seen is to read a changed value of potentiometer, a new PowerShell session must be started, Not just closing and opening the port.

Reading the first setting of the potentiometer:

1. Start Visual Studio  after connecting to the Arduino set up to read the Analog value.
2. Build and run to display the potentiometer readout on the Serial Monitor in Visual Studio
3. Disconnect the port from the Serial Monitor


4. Start a PowerShell session by launching PowerShell or Windows PowerShell ISE
Run the code shown in the following image:


5. Connect to the Serial Monitor and change the Potentiometer setting
6. If the serial montior does not display, build and run
7. Disconnect from the serial monitor
8. Start PowerShell and run code again


 Note that PowerShell code and SerialPort Monitor cannot both connect to COM Port.

Sunday, May 17, 2015

Debugging Arduino from Visual Studio

Please review the following before you continue as they are related:
http://hodentek.blogspot.com/2015/05/internet-of-things-arduino-and-visual.html

When you use the Local Debugger Tool in Visual Studio 2013 Community edition with your Arduino UNO board the build output windows as seen in this next image refers to a Serial Port Tool Bar.


If the board is not connected when you locally debug you get the following message in your build output window:
serialPortToolBar1

You may not see this Serial Port Toolbar unless you enable it as shown:

serialPortToolBar2

Since the board is not connected to the computer with the USB, the debugger is off and you get the message 'Port failed to open'.

serialPortToolBar3

Now I connect the Arduino UNO board to the laptop and on the Arduino UNO I click Reconnect and then I can stop/start/pause the processes to debug.


serialPortToolBar4

Placed a break point to see how to get to the local debugger windows.

serialPortToolBar7

Reading Serial port:
http://hodentek.blogspot.com/2015/06/arduinos-analog-serial-readout-with.html
 

Saturday, May 10, 2014

Wiring up the Internet of Things with Node-RED

Node-RED created in an IBM laboratory (UK) is a GUI for wiring up the Internet of Things (IoT)built-on Node.JS.


It is possible that some of you have known, or used LabView. LabView  is a GUI for wiring up complex laboratory equipment like Voltage sources, measuring instruments, automated relays, rf generators, lasers, robots etc., but Node-RED is some thing similar for IoT but lot more extensible network-wise. Of course my knowledge of LabView is not current and you may find more information from National Instruments.


Source: http://iotsolutionsalliance.intel.com/member-roster/national-instruments


Get a quick overview of Node-RED here:
http://nodered.org/

Node-RED is a browser based visual tool for creating flows of events and deploying to its light-weight runtime. It is developed as an open source project on GitHub under Apache License. It uses JSON format.

The background has been darkened to improve readability. The original from Node-RED.
For starters you should access this link to immediately get to know Node-RED.
http://nodered.org/docs/getting-started/installation.html

If you are working off Windows OS, this is where you can download.
https://github.com/joyent/node/wiki/Installing-Node.js-via-package-manager#windows

Supported hardware products are,

Arduino  --http://arduino.cc/en/Main/Products?from=Main.Hardware


Raspberry Pi (single board computer)--http://www.raspberrypi.org/resources/


Source:  Image from Wikipedia

BeagelBoneBlack---http://beagleboard.org/


Security will be a matter of great concern for IoT as it is for Cloud based services.
 
DMCA.com Protection Status