Review the following before reading this post:
http://hodentekmsss.blogspot.com/2016/05/watch-out-sql-server-2016-general.html
http://hodentekmsss.blogspot.com/2016/05/download-sql-server-management-studio.html
http://hodentekmsss.blogspot.com/2016/05/stretch-database-is-nice-feature-of-sql.html
Download the SQL Server 2012 Developer Edition from Microsoft Site.
Mount the .ISO file as described here.
Double click the executable file in the mounted drive.
Agree to updating computer information
SQL Server Installation center is displayed.
Install_00
Install_001
Click System Configuration checker.
Rules get checked as shown.
Install_002
Click OK
Click hardware and software requirements. You are taken to Microsoft site to review details.
Details here:
https://msdn.microsoft.com/en-us/library/ms143506(v=sql.130).aspx#top_principal
--------------
You can access a virtual machine on which SQL Server 2016 is already installed, if you have an Azure account for evaluation.
Install_003
Two types of editions:
Principal Editions--Enterprise, Standard and Web
Breadth Editions--Developer and Express
For Windows 10, the type can be either Standard in Principal
or Developer and Express in Breadth editions
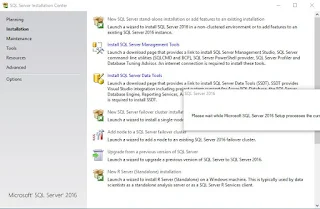
Click on Installation in SQL Server Installation Center to display Installation details
Install_004
Install_004_2
Click on the first option, New SQL Server stand-alone installation or add features to an existing installation.
The Product Key page is displayed. For developer edition no product key is required.
Install_005
Click Next to open the License Terms page as shown.
Install_006
Accept License terms and click Next.
Checks Global rules and takes you to product update page as shown
KB3164398---https://support.microsoft.com/en-us
Install_007
Click Next.
Install Setup Files page is displayed as shown.--this takes a while!
Install_008
Install_008_2
Install_008_3
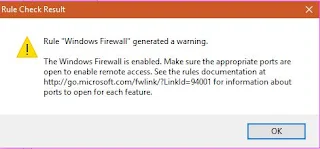
Click OK to Rules Check Result Message. Click Next
Features Selection page is displayed. Make selections
Install_009
After the 'Please Wait..' window the Instance Configuration window is displayed as shown.
Herein a named instance will be installed.
Installing a named instance called OHANA as shown
Install_010
Click Next. --after the 'Please Wait..' window
Polybase Configuration page is displayed as shown.
Install_011
Click Next. The Server Configuration page is displayed. The various service accounts needs to be set. In what follows, in this installation, the current computer user takes on all the accounts with his Windows password. This is just to keep it simple. In an enterprise, this way of handling must be avoided.
Install_012
Regarding initialization look here:
https://msdn.microsoft.com/library/ms175935(v=sql.130).aspx
---------------------------------
In the next couple of interactive windows the Service's Account Name will be changed to reflect the current user assuming them.
Click inside the Account Name window of the SQL Server Agent to bring up the drop-down menu.
Install_012_a
Click Browse...to display the Select User or Group window.
Install_012_b
Click Advanced... button.
Select User or Group (adv) page is displayed.
Install_012_c
Click Find Now button. The Search results pane gets populated with all relevant account information.
Install_012_d_1
Choose the Current User of computer by highlighting it and Click OK. The current user gets selected.
Install_012_e
Click OK. Current user account name is inserted for the SQL Server Agent's Account Name a shown.
Install_012_f
Do the same for the other services. Actually after doing for the SQL Server Agent you can copy the Account Name and paste in the other services. Enter password for each service, the same Windows password.
Install_013
Oops! there was a typo in the Reporting Services password field.
Install_013_1
--------------------------------------------------
Error in password for Reporting Services Corrected. Click Next.
Database Engine Configuration page is displayed.
Install_014
Click Add Current User on the Server Configuration tabbed pane as shown. The current user's user name gets added to the Specify SQL Server administrators'' pane
Install_014_a
Click Data Directories tab. In Data Directories accept default.
Install_014_b
Click TempDB tab. Note the file names and other details. Just accept the defaults.
Install_014_c
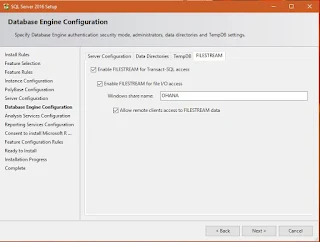
Click File Stream tab. Click all check boxes.
Install_014_d
Click Next.
Analysis Services Configuration mode is displayed
Default is Multidimensional and data mining mode. You can choose only a single server mode.
Accept default.
Install_015
Click Add Current User. Current User will be added as an administrator.
Click Data Directories tab.
Install_016
Make no changes and click Next.
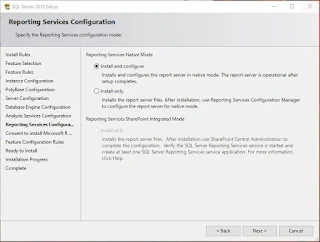
Reporting Services Configuration page is displayed as shown.
Install_017
Accept default and click Next.
The Consent to install Microsoft R Open page is displayed.
Install_018 --Please Wait window is displaeyd.
Click Next.
Feature configuration check is made and the Ready to Install page is displayed.
Install_019
Install_019_a
Install_019_b
Install_019_c
Install_019_d
Install_019_e
Install_019_f
Install_019_g
Click Install. The installation took slightly less than hour. This is the fastest ever for SQL Server in all these years.
The computer was not restarted but only the above message window clicked OK.
That's all.
http://hodentekmsss.blogspot.com/2016/05/watch-out-sql-server-2016-general.html
http://hodentekmsss.blogspot.com/2016/05/download-sql-server-management-studio.html
http://hodentekmsss.blogspot.com/2016/05/stretch-database-is-nice-feature-of-sql.html
Download the SQL Server 2012 Developer Edition from Microsoft Site.
Mount the .ISO file as described here.
Double click the executable file in the mounted drive.
Agree to updating computer information
SQL Server Installation center is displayed.
Install_00
Install_001
Click System Configuration checker.
Rules get checked as shown.
Install_002
Click OK
Click hardware and software requirements. You are taken to Microsoft site to review details.
Details here:
https://msdn.microsoft.com/en-us/library/ms143506(v=sql.130).aspx#top_principal
--------------
You can access a virtual machine on which SQL Server 2016 is already installed, if you have an Azure account for evaluation.
- Needs .NET Framework 4.6.1 and will be installed during SQL Server 2016 installation.
Install_003
- You need 1GB except for Express which needs only 512MB. Recommended is 4GB
- x64 Processor, 1.4 GHZ recommended 2.0 GHZ or higher
- No x86 bit server
- No WOW support either
- Management tools OK on WOW
Two types of editions:
Principal Editions--Enterprise, Standard and Web
Breadth Editions--Developer and Express
For Windows 10, the type can be either Standard in Principal
or Developer and Express in Breadth editions
Click on Installation in SQL Server Installation Center to display Installation details
Install_004
Install_004_2
Click on the first option, New SQL Server stand-alone installation or add features to an existing installation.
The Product Key page is displayed. For developer edition no product key is required.
Install_005
Click Next to open the License Terms page as shown.
Install_006
Accept License terms and click Next.
Checks Global rules and takes you to product update page as shown
KB3164398---https://support.microsoft.com/en-us
Install_007
Click Next.
Install Setup Files page is displayed as shown.--this takes a while!
Install_008
Install_008_2
Install_008_3
Click OK to Rules Check Result Message. Click Next
Features Selection page is displayed. Make selections
Install_009
After the 'Please Wait..' window the Instance Configuration window is displayed as shown.
Herein a named instance will be installed.
Installing a named instance called OHANA as shown
Install_010
Click Next. --after the 'Please Wait..' window
Polybase Configuration page is displayed as shown.
Install_011
Click Next. The Server Configuration page is displayed. The various service accounts needs to be set. In what follows, in this installation, the current computer user takes on all the accounts with his Windows password. This is just to keep it simple. In an enterprise, this way of handling must be avoided.
Install_012
Regarding initialization look here:
https://msdn.microsoft.com/library/ms175935(v=sql.130).aspx
---------------------------------
In the next couple of interactive windows the Service's Account Name will be changed to reflect the current user assuming them.
Click inside the Account Name window of the SQL Server Agent to bring up the drop-down menu.
Install_012_a
Click Browse...to display the Select User or Group window.
Install_012_b
Click Advanced... button.
Select User or Group (adv) page is displayed.
Install_012_c
Click Find Now button. The Search results pane gets populated with all relevant account information.
Install_012_d_1
Choose the Current User of computer by highlighting it and Click OK. The current user gets selected.
Install_012_e
Click OK. Current user account name is inserted for the SQL Server Agent's Account Name a shown.
Install_012_f
Do the same for the other services. Actually after doing for the SQL Server Agent you can copy the Account Name and paste in the other services. Enter password for each service, the same Windows password.
Install_013
Oops! there was a typo in the Reporting Services password field.
Install_013_1
--------------------------------------------------
Error in password for Reporting Services Corrected. Click Next.
Database Engine Configuration page is displayed.
Install_014
Click Add Current User on the Server Configuration tabbed pane as shown. The current user's user name gets added to the Specify SQL Server administrators'' pane
Install_014_a
Click Data Directories tab. In Data Directories accept default.
Install_014_b
Click TempDB tab. Note the file names and other details. Just accept the defaults.
Install_014_c
Click File Stream tab. Click all check boxes.
Install_014_d
Click Next.
Analysis Services Configuration mode is displayed
Default is Multidimensional and data mining mode. You can choose only a single server mode.
Accept default.
Install_015
Click Add Current User. Current User will be added as an administrator.
Click Data Directories tab.
Install_016
Make no changes and click Next.
Reporting Services Configuration page is displayed as shown.
Install_017
Accept default and click Next.
The Consent to install Microsoft R Open page is displayed.
Install_018 --Please Wait window is displaeyd.
Click Next.
Feature configuration check is made and the Ready to Install page is displayed.
Install_019
Install_019_a
Install_019_b
Install_019_c
Install_019_d
Install_019_e
Install_019_f
Install_019_g
Click Install. The installation took slightly less than hour. This is the fastest ever for SQL Server in all these years.
The computer was not restarted but only the above message window clicked OK.
Install_020
That's all.


No comments:
Post a Comment