Apps without data are not very useful and for Enterprise mobile apps it is a must. Appery.io provides a platform
to build apps with ease. Integrating with back-end data is as easy.
The example in this post is the same as the example at Appery.IO site although some names are different. You may find more details (screen shots) here than at the Appery.io site.
Here are steps to create apps which takes in data from the database.
Creating the App
Designing the APP UI
Import the Server Code script
Mapping the Service to the UI
Invoking the Service
Testing the app
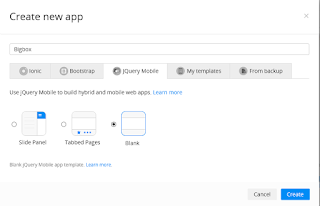
Go to Apps on Appery.io platform. Create a new App called Bigbox.

ApperyIO5_00
Choose new blank template using jQuery Mobile in Create new app window.
 ApperyIO5_01.PNG
Bigbox project page opens.
-------------
Designing the APP UI
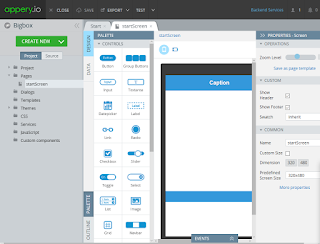
Click Open Pages and click on startScreen.
ApperyIO5_03.PNG
The startScreen header is now reading Caption, the same in the Properties -Header window as shown.

ApperyIO5_04.PNG
Change Caption to My App in the Proprieties - Header. The startScreen header also changes.
Drag and drop List from the PALETTE to the startScreen which now appears as shown.

ApperyIO5_05.PNG
As seen above, the List component comes with 3 list items. Since the database is loaded to the list item, you need only one list item and the other two are not needed.
In the bread-crumb of UI above click on mobilecontainer
In the Properties - List shown here.

ApperyIO5_06.PNG
Change Items from 3 to 1 and click Apply. Now two of the Link items disappears from the startScreen.
You can also remove the icon for the List. Click on Buttons Icon and choose No Icon.
 ApperyIO5_07.PNG
Now the > icon is gone.
With this the UI is done.
The final design of UI is as shown.
 ApperyIO5_08.PNG
------------------------
Import the Server Code script
Click Create New > Back-end Services > Server Code Service

ApperyIO5_09.PNG
Choose your script in the Import Server Code service as shown.

ApperyIO5_10.PNG
Click Import selected services.
The Services node in the Project folders gets the loaded service.

ApperyIO5_11.png
Click Test link on the left in the tabbed page loadGoodsScript_service.
 ApperyIO5_12.png
Click Test button far right in the Response pane.
The Response pane gets populated with data from the back-end database as shown.

ApperyIO5_13.png
The above is the JSON response from the database replying to your request. Now port this response to your app by clicking Import as Response button.
You have successfully created the Service response.

ApperyIO5_14.png
---------------------------------
Mapping the Service to the UI:
This step involves associating the database items to the UI elements.
Go to startScreen and click open the Data view.

ApperyIO5_15.png
Choose Service in the first drop-down box, the second automatically changes as shown.

ApperyIO5_16.png
Click Add and the UI changes as shown.

ApperyIO5_17.png
The Before Send events are not relevant and you can remove the Mapping button for the Before Send event.
For the Success event click the Mapping button. Mapping items from Service to the App is opened as shown.

ApperyIO5_18.PNG
Map the items as shown by joining the items shown with your mouse.
 ApperyIO5_19.PNG
Click Save and return at the right hand side of Mapping Editor.
The Data now looks like this.

ApperyIO5_20.PNG
Invoking the Service
Click DESIGN to open the Design View
Select startScreen in page bread crumbs
Open Events tab

ApperyIO5_21.PNG
For the EVENT choose Page show from this drop-down list.

ApperyIO5_22.PNG
For the ACTION choose Invoke service

ApperyIO5_23.PNG
Click Save.
Testing the app
Click Test at the top.
App gets launched as shown

ApperyIO5_24.PNG
In the Apps page you can see the details of this app.

ApperyIO5_25.PNG
That is all folks!
.
The example in this post is the same as the example at Appery.IO site although some names are different. You may find more details (screen shots) here than at the Appery.io site.
Here are steps to create apps which takes in data from the database.
Creating the App
Designing the APP UI
Import the Server Code script
Mapping the Service to the UI
Invoking the Service
Testing the app
Go to Apps on Appery.io platform. Create a new App called Bigbox.

ApperyIO5_00
Choose new blank template using jQuery Mobile in Create new app window.

Bigbox project page opens.
-------------
Designing the APP UI
Click Open Pages and click on startScreen.

ApperyIO5_03.PNG
The startScreen header is now reading Caption, the same in the Properties -Header window as shown.

ApperyIO5_04.PNG
Change Caption to My App in the Proprieties - Header. The startScreen header also changes.
Drag and drop List from the PALETTE to the startScreen which now appears as shown.

ApperyIO5_05.PNG
As seen above, the List component comes with 3 list items. Since the database is loaded to the list item, you need only one list item and the other two are not needed.
In the bread-crumb of UI above click on mobilecontainer

ApperyIO5_06.PNG
Change Items from 3 to 1 and click Apply. Now two of the Link items disappears from the startScreen.
You can also remove the icon for the List. Click on Buttons Icon and choose No Icon.

Now the > icon is gone.
With this the UI is done.
The final design of UI is as shown.

------------------------
Import the Server Code script
Click Create New > Back-end Services > Server Code Service

ApperyIO5_09.PNG
Choose your script in the Import Server Code service as shown.

ApperyIO5_10.PNG
Click Import selected services.
The Services node in the Project folders gets the loaded service.

ApperyIO5_11.png
Click Test link on the left in the tabbed page loadGoodsScript_service.

Click Test button far right in the Response pane.
The Response pane gets populated with data from the back-end database as shown.

ApperyIO5_13.png
The above is the JSON response from the database replying to your request. Now port this response to your app by clicking Import as Response button.
You have successfully created the Service response.

ApperyIO5_14.png
---------------------------------
Mapping the Service to the UI:
This step involves associating the database items to the UI elements.
Go to startScreen and click open the Data view.

ApperyIO5_15.png
Choose Service in the first drop-down box, the second automatically changes as shown.

ApperyIO5_16.png
Click Add and the UI changes as shown.

ApperyIO5_17.png
The Before Send events are not relevant and you can remove the Mapping button for the Before Send event.
For the Success event click the Mapping button. Mapping items from Service to the App is opened as shown.

ApperyIO5_18.PNG
Map the items as shown by joining the items shown with your mouse.

Click Save and return at the right hand side of Mapping Editor.
The Data now looks like this.

ApperyIO5_20.PNG
Invoking the Service
Click DESIGN to open the Design View
Select startScreen in page bread crumbs
Open Events tab

ApperyIO5_21.PNG
For the EVENT choose Page show from this drop-down list.

ApperyIO5_22.PNG
For the ACTION choose Invoke service

ApperyIO5_23.PNG
Click Save.
Testing the app
Click Test at the top.
App gets launched as shown

ApperyIO5_24.PNG
In the Apps page you can see the details of this app.

ApperyIO5_25.PNG
That is all folks!
.